Friday, 24 February 2012
Thursday, 23 February 2012
How to reset your Sony Vegas Pro 10 layout
A common problem in Sony Vegas Pro 10 is accidentally adjusting the layout, and then struggling to fix it; as you cannot undo the programs’ workspace changes with Ctrl + Z.
Here’s a way that should work and reset your Sony Vegas Pro 10 layout back to default.
Here’s a way that should work and reset your Sony Vegas Pro 10 layout back to default.
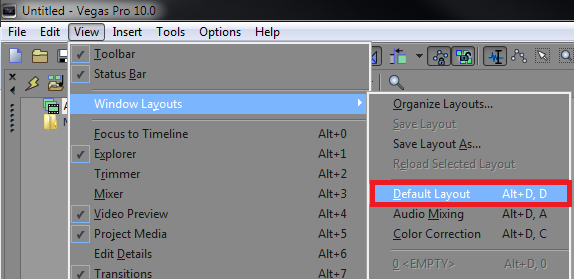
In the top left corner navigate to View > Window Layouts > Default Layout. You can also use the shortcut Alt + D.
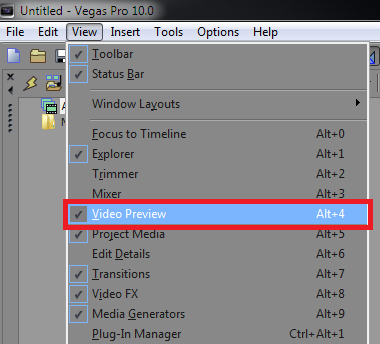
You can also show and hide separate windows in Sony Vegas Pro 10 by checking or unchecking items the “View” list. For example hiding the Video Preview window.
How to Stabilize a video in Sony Vegas Pro 11
A common question I get asked is “I’m having problems stabilizing my video, how do I do this correctly?” These problems of video stabilization revolve around the user either not setting up the feature fully, or simply using it incorrectly. In this tutorial, I’m going to show you how to stabilize a video in Sony Vegas Pro 11.
You may notice that in Sony Vegas Pro 11, video stabilization is different from the previous version Sony Vegas Pro 10. With the difference, they’ve added it as a plugin. I personally find this a lot more effective, because I have more control with the plugin. I could go back easily and make different changes to the stabilization I have already applied, as explained near the end of this tutorial.
So, let’s get started with the tutorial. The first thing you’re going to want to do is import your media into Sony Vegas, and place it within the timeline.
Now, you want to select the event in the timeline you wish to apply the stabilization to. To select the event, simply click it, and you should see it is highlighted within the time-line.
 Once the event is highlighted and selected, navigate to Tools > Video > Media FX.
 You’re going to get a pop-up with a whole lot of plug-ins in a big list. Make sure that you can see all of the plug-ins, by selecting the FX parent folder. Navigate through the list and select “Sony Stabilize”. Select the “Sony Stabilize” plug-in, and then click “Add”. Once you’ve done that, hit OK.

 Once the event is highlighted and selected, navigate to Tools > Video > Media FX.
 You’re going to get a pop-up with a whole lot of plug-ins in a big list. Make sure that you can see all of the plug-ins, by selecting the FX parent folder. Navigate through the list and select “Sony Stabilize”. Select the “Sony Stabilize” plug-in, and then click “Add”. Once you’ve done that, hit OK.
Now you’ll be presented with the effects that you can change. From here, you may want to select a preset from the list within the Media FX window. Click the preset drop-down menu at the top of the window, and then select either Light, Medium or Heavy Stabilization.

I’d recommend using one of those presets as a base, and then if needed, further customize their effects by adjusting the “Pan smoothing” and “Stabilization amount” options. These options are adjusted from 0 to 1; meaning the higher the number, the more of an impact the option will have on the video. You may also want to enable “Rolling shutter correction”, however this varies between cameras.

There’s no perfect setting that’s going to work for every video, so you’ll have to play around with the settings a bit to achieve the best result. Once you feel you’ve set your settings appropirately, simply click “Apply”. Once you’ve done that, it will render the Stabilization to the media FX.

If you find that the settings you supplied earlier aren’t an effective stabilization, you can always change the stabilization settings again, by right clicking the media in the time-line, and then selecting Media FX. Alternatively, you could navigate to Tools > Video > Media FX, with the media selected. Once you’re back into the Media FX window, you’ll see the same settings you applied previously. You can of course adjust these settings for a better result, and then click “Apply” again, and your video will be rendered again, with the new settings you provided.
Note: When stabilizing a video, is that you’re most likely going to lose some of the pixels around the image. The image is ‘cropped’, and the motion is adjusted behind-the-scenes in Sony Vegas, to try and remove the shakiness of the video. The lighter the stabilization, the less of the edges you’re going to lose on your video. If Vegas didn’t zoom in on your video, you’d see a lot of black around the video, because Sony Vegas simply doesn’t have that information in the video.
In this Sony Vegas Tutorial you'll start learning the Basics of Sony Vegas. If you've just picked up this piece of software and have been wondering how to use it, hopefully this video (along with my others) will give you a hands on look at the program as well as a guide in exploring its various features


